Setup a Virtualmin Server on CentOS 7
Well hello there! In this tutorial, we’re going to take a bare CentOS 7 server and install Virtualmin. Along the way we’ll get it ready for some basic spam filtering with postfix and make it ready for general use. This build was originally deployed on a VPS over at OVH.com. They have great deals on cheap servers, and I’ve been impressed with the speed. For $3.49/mo you get an OpenStack KVM server with 1 core, 2GB memory and 10GB of SSD disk. More info is here: https://www.ovh.com/us/vps/vps-ssd.xml
And in case you’re wondering: No, I don’t get anything from OVH for talking about it. It’s just a good deal, and it works.
When you order, you’ll want to select CentOS 7 as your OS. In a little bit, you’ll get an email that contains all the information you need to log in to your server.
Step 1: Install some preliminary packages
Before we get too far, we’ll need some basic Linux tools that a base install of CentOS 7 does not have. Run the following command:
yum -y install perl lsof sysstat lsof traceroute whois wget ftp nano
Step 2: install your SSH key
I strongly recommend securing ssh and only using key based authentication. I already have a Linux server at home that I use as a media server and a “jump box” of sorts, and it has my ssh private and public keys already set up. For me, the first step was logging in with SSH as “root” and installing my public SSH key. I copied my key to the server and set permissions on the authorized_keys file. If the /root/.ssh directory does not yet exist, then create it and chmod it to 600.
mkdir /root/.ssh
nano /root/.ssh/authorized_keys
chmod 600 /root/.ssh/authorized_keys /root/.ssh
From here you can disable ssh password authentication for the root user, but I’m not going to discuss that here.
Step 3: Set your hostname
OVH, and many other providers, will give you a default hostname. There’s nothing wrong with that, but for a web hosting server, you want to use a hostname that matches your branding or at least your domain name. Normally you need to reboot after doing this, but we’ll be rebooting after some other steps, so we’ll hold off rebooting just yet. For now just use the following command to set a hostname.
A word about hostnames: “www.yourname.com” is not a valid hostname. You need to use something like “server.yourname.com” or “foo.yourname.com”. If you use “www” then it’ll interfere with the Apache virtualhosts later on, and you don’t want that. Also don’t use “new-server” or some other “new” designation. Eventually this is going to be your old server, so make it something timeless and easy to type. Many folks use characters from their favorite show or some other theme.
echo "batman.yourname.com" > /etc/hostname
Step 4: Turn off SELinux
This interferes with a lot of things and isn’t generally used on a web server, so lets turn it off with the following command.
sed -i 's/SELINUX=enabled/SELINUX=disabled/' /etc/selinux/config
Step 5: Change the command prompt to have the full working directory.
I like to have the full working directory in the command prompt for clarity.
nano /root/.bash_profile
add the following line:
export PS1="[\u@\h \w]# "
Step 6: Reboot
Now it’s time to enact the changes in hostname and the disabling of SELinux. Just type the word “reboot” and wait about a minute to log back in.
Step 7: Install Virtualmin
Now we get to install Virtualmin. From their website virtualmin.com: “Virtualmin is a powerful and flexible web hosting control panel for Linux and BSD systems.” The nice thing is that it’s fairly lightweight, is free, and is open source. There are other options, but this is the one I chose based on my needs which admittedly were very specific. It’s a good control panel though and I’ve come to like it quite a bit. One of the beautiful things is that it installs a complete LAMP stack for you- did you notice that we’ve not installed Apache, MySQL, Postfix, PHP, or really any other services? The Virtualmin installer does this for you.
If you are starting this tutorial on a box already configured with sites- stop. This tutorial isn’t for you. Virtualmin needs a clean installation to start with. You’ll need a new server and then can migrate your sites to it.
Paste the following commands:
wget http://software.virtualmin.com/gpl/scripts/install.sh
sh install.sh
This is what you’ll see:
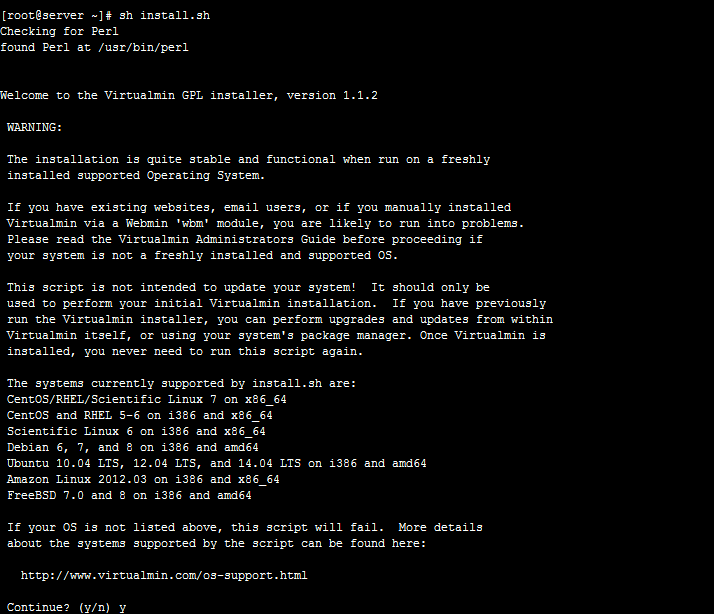
Press “y” and then press Enter, and wait 10-15 minutes. Got get some coffee or stretch your legs. I prefer pretty much anything with caffeine. Put on some tunes, and lets get configuring!
[For the tutorial, we’re going to pretend that the IP for this server is 10.10.0.55. Replace 10.10.0.55 with your actual IP from here on out.]
First, log in to your new Virtualmin control panel at https://10.10.0.55:10000
Step 8: Disable Mailman
Unless you want to have Mailman based mailing lists, you need to disable that feature in Virtualmin before we go much farther. Go to System Settings -> Features and Plugins, and in there you can disable the Mailman feature and Save.
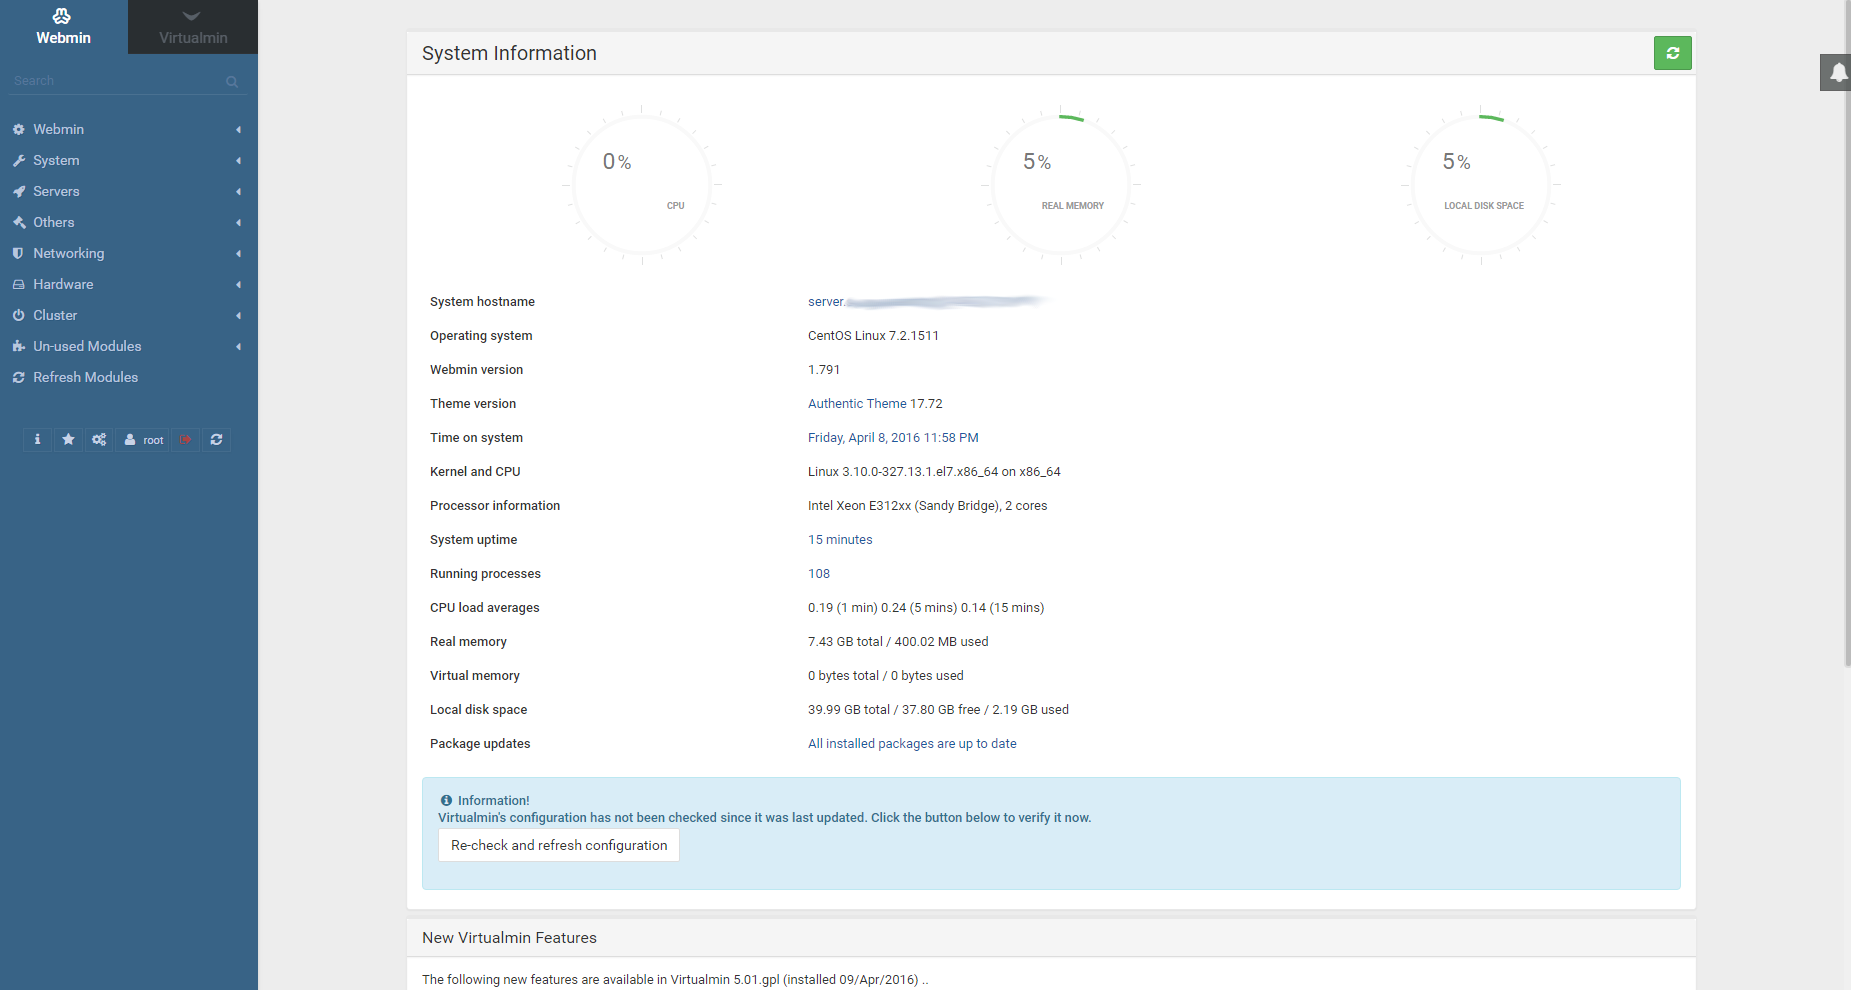
Congrats! You have a functioning Virtualmin server. It’s not quite ready to rumble though. There are some tweaks that need to be made. DNS doesn’t work out of the box, and there’s no spam filtering. We’ll fix those things and more. Here is what you should see:
Step 9: Configure DNS so that it answers queries for your zones
For this we’re going to replaced the named.conf configuration file. It’s easy to do. Copy the config file from below, then make a backup copy of the config, and paste the new configuration into a fresh file. Here are the steps:
[root@server ~]# cd /etc/
[root@server /etc]# cp named.conf named.conf.bak
[root@server /etc]# > named.conf
[root@server /etc]# nano named.conf
Now paste in the following:
 //
 // named.conf
 //
 // Provided by Red Hat bind package to configure the ISC BIND named(8) DNS
 // server as a caching only nameserver (as a localhost DNS resolver only).
 //
 // See /usr/share/doc/bind*/sample/ for example named configuration files.
 //

options {
 directory "/var/named";
 dump-file "/var/named/data/cache_dump.db";
 statistics-file "/var/named/data/named_stats.txt";
 memstatistics-file "/var/named/data/named_mem_stats.txt";

/*
 - If you are building an AUTHORITATIVE DNS server, do NOT enable recursion.
 - If you are building a RECURSIVE (caching) DNS server, you need to enable
 recursion.
 - If your recursive DNS server has a public IP address, you MUST enable access
 control to limit queries to your legitimate users. Failing to do so will
 cause your server to become part of large scale DNS amplification
 attacks. Implementing BCP38 within your network would greatly
 reduce such attack surface
 */
 recursion no;

dnssec-enable yes;
 dnssec-validation yes;

/* Path to ISC DLV key */
 bindkeys-file "/etc/named.iscdlv.key";

managed-keys-directory "/var/named/dynamic";

pid-file "/run/named/named.pid";
 session-keyfile "/run/named/session.key";
 allow-recursion {
 localnets;
 127.0.0.1;
 };
 allow-query { any; };
 };

logging {
 channel default_debug {
 file "data/named.run";
 severity dynamic;
 };
 };

zone "." IN {
 type hint;
 file "named.ca";
 };

include "/etc/named.rfc1912.zones";
 include "/etc/named.root.key";
Save the file and exit, then restart BIND with the following command:
systemctl restart named
Now your server will serve zone files correctly when you start installing accounts.
10: Add PHP 5.6 with OPcache
This step is optional. Virtualmin comes with PHP 5.4.16 out of the box, but I wanted something more modern than that, and faster. PHP 5.6 with OPcache fits the bill and is pretty easy to install. We’ll need to follow a few steps to get it installed. You can paste these in, but I recommend doing it one-by-one.
yum -y install scl-utils
yum install centos-release-scl-rh
yum -y install rh-php56 rh-php56-php-mysqlnd rh-php56-php-opcache
systemctl restart httpd
This will install php 5.6 in /opt/rh/rh-php56/root/bin/php, and all its tools are there. If you need to install a pear module for php 5.6, you’d use /opt/rh/rh-php56/root/bin/pear rather than /usr/bin/pear which is configured for php 5.4. Virtualmin will automatically assign the newest PHP version available, but it is fairly simple to assign PHP 5.4 to a directory or an entire account, for compatibility reasons.
11: Add RBL’s and whitelisting to Postfix
Every so often you might get someone who is unable to contact an address on your server because their ISP or host is on a Realtime Block List. So, you can configure Postfix to whitelist just that users email address, or even the entire domain. For that we need to create the files that contain the domain names or email addresses, and use Postmap to put them into a hash format that Postfix understands. Paste in the following lines:
touch /etc/postfix/rbl_override /etc/postfix/sender_access
postmap /etc/postfix/rbl_override
postmap /etc/postfix/sender_access
If you want to exclude an IP from being checked by the Realtime Block List checks, then simply add the following line to /etc/postfix/rbl_override (use the actual IP, not this example!):
192.168.1.4 OK
then run
postmap /etc/postfix/rbl_override; postfix reload
to enact the changes. The same format goes for sender_access. Run postmap on it and then do a postfix reload. The format for sender_access is:
myfriend@example.com OK
 junk@spam.com REJECT
Did I mention you can block specific addresses this way too? You can block specific addresses this way too 😉
Now we need to edit Postfix’s main configuration file: main.cf. Let’s make a backup first, just in case:
cp /etc/postfix/main.cf /etc/postfix/main.cf.backup
Now edit the main.cf file:
nano /etc/postfix/main.cf
If you’re using nano, just press ctrl+k to remove the line, and then paste in its replacement.
Replace the following line:
smtpd_recipient_restrictions = permit_mynetworks permit_sasl_authenticated reject_unauth_destination
With the following:
smtpd_recipient_restrictions =
 permit_mynetworks,
 permit_sasl_authenticated,
 permit_inet_interfaces,
 reject_unauth_destination,
 check_client_access hash:/etc/postfix/rbl_override,
 check_sender_access hash:/etc/postfix/sender_access,
 reject_invalid_hostname,
 reject_non_fqdn_sender,
 reject_non_fqdn_recipient,
 reject_unknown_sender_domain,
 reject_unknown_recipient_domain,
 reject_unknown_client_hostname,
 reject_unauth_pipelining,
 reject_rbl_client bl.spamcop.net,
 reject_rbl_client cbl.abuseat.org,
 reject_rbl_client zen.spamhaus.org,
 reject_rbl_client dnsbl.sorbs.net,
 reject_rbl_client b.barracudacentral.org,
 reject_rbl_client dnsbl-1.uceprotect.net,
 reject_rbl_client dnsbl-2.uceprotect.net,
 permit
Now we need to tell Postfix to refresh its configuration:
postfix reload
12: Fix Poodle
Apache comes setup to allow vulnerable versions of the SSL protocol to be used, which can allow a data breach. So lets plug the hole. Edit the Apache configuration file:
nano /etc/httpd/conf/httpd.conf
Find the “SSLProtocol” line and add “-SSLv3” to it so that it looks like this:
SSLProtocol ALL -SSLv2 -SSLv3
Now restart Apache to load the new configuration.
systemctl restart httpd
13: Tweak MySQL
Now lets fix up MySQL to be just a bit more thrifty with memory usage. Use nano (or your favorite editor) to open /etc/my.cnf and locate the following lines:
 symbolic-links=0
 innodb_file_per_table = 1
After those lines, paste in the following:
 innodb_buffer_pool_size = 64M
 myisam_sort_buffer_size = 8M
 read_rnd_buffer_size = 512K
 net_buffer_length = 8K
 read_buffer_size = 256K
 sort_buffer_size = 512K
 table_open_cache = 64
 max_allowed_packet = 1M
 key_buffer_size = 16M
Save the file, and then restart MySQL (MariaDB)
systemctl restart mariadb
14: Tweak OPcache
We don’t want OPCache to use more memory that it needs. It’s best to start small and go bigger if needed. Lets go into the php 5.6 configuration directory:
cd /etc/opt/rh/rh-php56/php.d
Now we’ll back up our configuration just in case:
cp 10-opcache.ini 10-opcache.ini.orig
Now clear then edit the opcached config file:
> 10-opcache.ini
 nano 10-opcache.ini
Paste in the following:
zend_extension=opcache.so
 opcache.enable=1
 opcache.memory_consumption=64
 opcache.interned_strings_buffer=8
 opcache.max_accelerated_files=6000
 opcache.fast_shutdown=1
 opcache.blacklist_filename=/etc/opt/rh/rh-php56/php.d/opcache*.blacklist
Now restart Apache:
systemctl restart httpd
Now you can use OPcache for your sites. Here’s a good script for monitoring it from a web page:
https://github.com/rlerdorf/opcache-status/blob/master/opcache.php
15: Install Advanced Policy Firewall/Brute Force Detector
APF is the Advanced Policy Firewall, BFD is Brute Force Detector. BFD works with APF to ban IP’s that are trying to brute force their way into accounts, which negates the need for fail2ban. They are generally good, and are open source. You can read about APF and BFD here: https://blog.asmallorange.com/2013/12/intro-to-advanced-policy-firewall-and-brute-force-detection/
First we need to install them:
wget http://www.rfxn.com/downloads/bfd-current.tar.gz
 wget http://www.rfxn.com/downloads/apf-current.tar.gz
 tar -zxf bfd-current.tar.gz
 tar -zxf apf-current.tar.gz
 cd apf-9.7-2
 ./install.sh
Now we need to configure it to allow ports for our server, including Virtualmin.
nano /etc/apf/conf.apf
Look for the following lines (search for the value before the = sign) and remove them, and replace them with the lines below:
IG_TCP_CPORTS="21,22,25,26,53,80,110,143,443,465,587,5432,993,995,10000,20000"
 EG_TCP_CPORTS="21,22,25,26,53,80,110,143,443,465,587,5432,993,995,10000,20000"
 IG_UDP_CPORTS="20,21,53,873.5901"
 TOS_8="21,20,80,443,10000"
 TOS_16="22,25,53,80,443"
Now you’ll need to restart APF:
apf -r
Make sure you can still log in remotely from another ssh session, and also make sure that virtualmin is still answering on port :10000 by going to your Virtualmin control panel. If all is well, then edit /etc/apf/conf.apf again, and change
DEVEL_MODE="1"
to
DEVEL_MODE="0"
Now restart apf again with apf -r.
apf -r
Now we must configure BFD, and this part is very easy.
cd /root/bfd-1.5-2/
 ./install.sh
Finishing up:
Service/Server SSL
The next steps for setting up your server are fairly basic, so I won’t explain how to do this step-by-step. You’ll want to install a Virtualmin account for the servers hostname, such as “yourname.com”, and make sure that SSL is enabled for it when creating it. Then create an SSL certificate for it with the LetsEncrypt module. Make sure to create the SSL certificate so it matches your full hostname and domain name such as “batman.yourname.com www.yourname.com yourname.com”, and copy that SSL certificate to Webmin and Usermin and the other services. That’ll encrypt your control panel so you don’t have SSL errors.
Post-Installation Wizard
Run the Virtualmin post-installation wizard. If you have a small VPS, select the low-memory options. Leave the mysql password blank, and don’t edit the configuration since we already did that.
Setting up DNS for Web Hosting
You’ll also need to create A records in the zone file for yourname.com for ns1 and ns2.yourname.com, and point them at your servers IP address. Then go to your registrar for your domain name, and register those name servers. Then you can point your domain to ns1 and ns2.yourname.com, and it’ll work when you create a hosting account for it.
Conclusion
There’s certainly a lot more that can be done with the server configuration. I prefer to have watchdog scripts to make sure I’m alerted if the mail queue gets too big (an indicator of a compromised account) and get weekly reports on the effectiveness of my spam blocking.
More Information
For more information about the exact use of Virtualmin, I recommend checking out the second half of the following tutorial for some nice screen shots and explanations of features:
https://www.digitalocean.com/community/tutorials/how-to-install-and-utilize-virtualmin-on-a-vps